Tuesday, January 31, 2012

China Glaze It's Alive

Hey guys!

I've been on a real China Glaze kick lately!  I've always called myself an OPI girl, but I think CG is quickly taking over my collection.  So, today I have yet another CG!  This is It's Alive and it's from the Fall 2011 Haunting collection.  It's Alive is a murky olive green glitter in a dark green jelly base.  To me this is just like CG Tinsel Town, except a different color.

China Glaze It's Alive


w/flash

no flash with artificial light

The formula is relatively thin and easy to work with.  I used 2 coats for full coverage.  Like Tinsel Town, this dried with a gritty finish, so I used 2 layers of top coat to smooth it out and add some shine.  I'm so happy I was able to find this polish at www.VictoriasNailSupply.com.  I missed out on it when the collection was released and I've been on the hunt ever since.  It's Alive is definitely unique, even for a Halloween collection.  Yet another beauty from China Glaze!

Thanks for stopping by!

K

Monday, January 30, 2012

Victoria Nail Supply Review

Hey guys!
Today I have a review for the etailer Victoria Nail Supply.  I'm really going to try to keep this short!  I came across this website while Googling China Glaze retailers.  Since a lot of nail bloggers speak highly of it, I figured I should give a try.  I logged onto their website at www.VictoriasNailSupply.com, and set up an account.  The website is pretty basic and easy to use.  On the left sidebar are all of the different product types that they carry including polishes and all of your manicure essentials.  I was specifically looking for the China Glaze Electropop collection which is shown on the web page under "Featured Products".  They had the Electropop collection plus a huge amount of China Glaze and other brands such as Orly, Essie, Color Club and retired OPI's.  I ended up ordering 8 China Glaze polishes, which ranged in price from $2.75-$3.75.  I typically spend $5.99 on China Glaze at Sally's, so this was a great deal.  The best thing was that they have a lot of older limited edition colors that are not part of their permanent line.  After filling my cart,  I went to checkout and figure my shipping cost.  For 8 polishes my shipping fee was $11.00, which brought my total to about $33.00.  (I've never ordered polish online, so I can't say if this is low or high for shipping, but I can say that even with s/h, I payed less than if I went to Sally's or Ulta.)  VNS accepts Visa, MasterCard, American Express, Discover and Money Orders for payment. I chose to use my Paypal account for some extra security.  I placed my order on 1/17/12, with an estimated delivery date of 1/20/12.  My order wasn't delivered until 1/23/2012 but I was able to track my order through the UPS website.  When my order arrived, I couldn't wait to open it up and insepct the bottles.  Inside the delievery box were 2 smaller boxes that were wrapped in tissue to keep them from bouncing around.  Inside the little boxes were my China Glazes, which looked beautiful and free of any damage. 
I'm going to give my experience with Victoria's Nail Supply an A+!  I base this on the low prices, stock selection, prompt shipment and website (very easy to shop). My only "complaint" is that you have to spend atleast $15.00 before shipping in order to place an order, but spending $15 was not a problem for me!  Another thing I should add, is that my order went very smoothly, so I had no need to talk to Customer Service. The website does discuss Customer Service issues (i.e. damaged/missing items and shipping issues) and they seem to really want to resolve any issues and have happy, loyal customers. 

So will I order from VNS again?  Definitely...and probably very soon!


Here are the pretties that I ordered:

(L-R) Dorothy Who?, It's Alive, Nova, Haunting

(L-R) Agent Lavender, Fuchsia Fanatic, Kinetic Candy, Aquadelic
Thanks for stopping by!

K

Sunday, January 29, 2012

China Glaze Kinetic Candy

Hey guys!

China Glaze just released their Spring 2012 collection called Electropop.  Unfortunately, I wasn't too excited about this collection.  The colors are pretty and fun, but they are by no means unique.  When I saw the collection, I told myself I'd only buy the colors I like, and don't have dupes for.  There are 12 polishes in this collection; 6 brights and 6 lights.  I decided to get Kinetic Candy, Aquadelic and Fuchsia Fanatic.  I will probably end up getting the rest of the brights....but I'll pass on the pastel colors.

Here is Kinetic Candy, a dusty light blue creme.
China Glaze Kinetic Candy
w/flash
China Glaze Kinetic Candy

no flash with artificial light
Application on this one wasn't ideal.  It was pretty streaky but thick at the same time, so I used 2 coats for full/even opacity.  I have to say, I was not impressed with this one.  The light blue reminded me of Easter candy and it did not work with my skin tone.  I love China Glaze and normally I at least like their colors, so I was pretty bummed with how much I did not like this one :(

Thanks for stopping by!

K

China Glaze Dorothy Who? (2009)

Hey guys!

I thought I'd sneak in a quick post before I go to bed.  Today I have China Glaze Dorothy Who?  from the Wizard of Ooh Ahz collection.  Dorothy Who? is a blue jelly polish with micro glitter.  This was one of those polishes that I said I didn't NEED, but when I'd leave the store I'd kick myself for not getting it.  So I finally broke down and added it to my Victoria Nail Supply order.  Boy am I happy I did......because I love it!   

China Glaze Dorothy Who?
w/flash

no flash with artificial light

Application was wonderful, not too thin, not too thick....just perfect!  I was able to get full coverage with one coat, but it was little lighter than I wanted.  I applied a second coat and got a darker, richer look.  I can't believe it took me so long to get this.  I had so many compliments on it, and I kept catching myself staring at my nails.

Oh!  And I learned something new today too!  While Googling Dorothy Who? for some swatches, I found out that this collection is somewhat of a re release.  Apparently China Glaze had a Wizard of Oz collection in 2001, which was a limited edition.  It sounds like it was a huge hit.....so nail polish lovers petitioned to have the collection re released.  Polish lovers talked, and China Glaze listened, and in 2009 they released The Wizard of Ooh Ahz Returns collection.  Apparently the colors are pretty similar to the original.  And best of all, Dorothy Who? is now a permanent color.

Thanks for stopping by!

K

Friday, January 27, 2012

Glitterific Leopard Print Mani

Hey guys!

I have a really fun mani to share with you today.  For this mani I used OPI Spark de Triomphe which a clear base with silver and gold glitter, and OPI Show It and Glow It! which is a fuchsia pink glitter with bits of multicolored glitter.

I started off with 2 coats of OPI Spark de Triomphe.  Then using plate m57, I applied the leopard print design with Konad Special Polish in Black Pearl.  For some extra sparkle, I used OPI Show It and Glow It! to fill in the leopard spots. 

Leopard print mani
w/flash

no flash with artificial light
As far as application goes, Spark de Triomphe went on perfectly.  It's pretty thin and sheer, but it builds up nicely.  Show It and Glow It! is another story.  I've had this polish for about a year, and I have always had problems with it.  It gets really thick and goopy, even with tons of polish thinner.  The brush is also really big and full at the end, making it hard to work with.  Hopefully I just got a bad bottle.  But even though it's a pain, it's still one of my favorite OPI polishes.  Overall I think this mani turned out pretty good.  It ended up taking me longer than I planed, so I kind of rushed it and didn't do the cleanest job.  It's always fun to play around with image plates, but it can be a little time consuming!

Thanks for stopping by!

K

Thursday, January 26, 2012

Helloooo Flakies!

Hey guys!

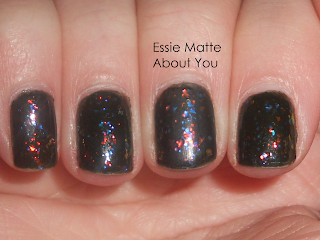
So I was at my local Sally's the other day, and I saw the new Finger Paints Special Effects Flakies.  I've never owned a flakie, and to be honest I never really cared for the look.  But lately it seems like flakies are taking over the nail polish world.  So I decided to pick up one bottle and give it a shot.  I chose Finger Paints Asylum which has blue and orangey/red flakes. I started off with 2 layers of OPI Here Today....Aragon Tomorrow, which is a really dark green that looks almost black.  I figured a dark base would really make the flakies pop.  Then I added 2 coats of Asylum and topped it off with Seche Vite.  On my middle finger I added a layer of Essie Matte About You, it really makes the flakies pop.


OPI Here Today....Aragon Tomorrow with Finger Paints Asylum
w/flash

Finger Paints Asylum
With Essie Matte About You on middle finger

I have to say I love the final look.  I'm think I'm officially a flakie fan!  It's probably not an everyday look, but it's nice to dress up a boring mani or even freshen up an older mani.  I can't wait to layer Asylum over different colors.  Flakies seem to take on different colors depending on the base color.

Finger Paints are sold exclusively at Sally's Beauty Supply.  The Finger Paints Special Effects collection consists of 5 flakies; Asylum, Flecked, Flashy, Motley, and Twisted.  They each retail at $5.49.

Thanks for stopping by!

K

First Pink Wednesday Post and Gradient Tutorial

Hey guys!

This is my first Pink Wednesday post, and I'm so excited!  If you haven't seen Mean Girls, I highly recommend it.  I wanted to do something fun in honor of Pink Wednesday, so I decided on a pink gradient mani.  I figured while I was at it, I would put together a little tutorial.  After looking at other tutorials, I noticed that I do gradients a little differently than others.  I start my gradients at the nail bed, while other people start at the tip.  My way is what works for me, but know that there are other methods out there that might work better for you. 

Let's get started!  I used the following for this manicure:

Left to right: Essie Billionails (nail treatment and base coat), OPI Bubble Bath, China Glaze Go Go Pink; OPI Teenage Dream; China Glaze Material Girl, Seche Vite Dry Fast Top Coat and upfront is Weleda Pomegranate Regenerating Hand Cream.
Gradient Mani Tutorial

Supplies you will need:
 -nail polish remover and polish thinner if needed
 -base coat
 -top coat,
 -2 cream/shimmer polishes, 2 glitter polishes (this is what I used....but don't be afraid to play with different finishes and colors!)
 -moisturizing cream, or cuticle oil
 -cotton balls or tissue for polish remover
 (-optional: make-up sponge for blending.  You can use a sponge to blend the colors together, for this manicure I chose not to do this because the glitter will help blend the colors and hide the seams.)

1.  Use nail polish remover to remove your old mani and any oils on the nail.  Wash hands or soak nails in warm water; dry nails thoroughly.

2.  Apply a base coat, followed by the lightest cream/shimmer polish over the entire nail.  I chose OPI Bubble Bath.

3.  Apply the darker cream/shimmer polish to the nail, covering the top 2/3 of the nail. I chose China Glaze Go Go Pink.  (Don't worry about making a clean line when you start your next color, the more jagged the line is, the better it will blend.)

Step #3
4.  Apply the darker glitter polish to the tip of the nail.  I chose China Glaze Material Girl.

Step #4
5.  Apply the lighter glitter polish to the entire nail, I chose OPI Teenage Dream, followed by the top coat.  And don't forget to moisturize!

Step #5
Final results after cuticle oil and moisturizer
w/flash
no flash with artificial light
I hope you enjoyed this tutorial!  It was fun to do, and I definitely plan on doing more tutorials.  If there's anything you'd like me to make a tutorial for, comment below or e-mail me and I will do my best to put one together.

Thanks for stopping by!

K

Tuesday, January 24, 2012

China Glaze Lorelei's Tiara and Some Like it Haute

Hey guys! 

It's time for the final two polishes from the China Glaze Eye Candy collection. 

First is Lorelei's Tiara, a clear base with sterling silver micro glitter and medium blue hex glitter. 

China Glaze Lorelei’s Tiara
no flash with artificial light

w/flash
This one was a little sheer, but 3 thin coats was enough for full coverage.  I really liked this formula because even with 3 coats it isn't too "heavy" on the nail.

The last polish is my favorite from this collection.  Some Like it Haute is like a glitter bomb!  The base is a charcoal gray glitter with silver and holographic glitter.  I'm pretty sure I could wear this color every day and not get sick of it. 

China Glaze Some Like it Haute
no flash with artificial light

w/flash

Blurred to show holographic glitter

Application was kind of tricky but so worth it.  I used two thin coats for full coverage.  After I applied the first coat I waited until it was dry, which isn't long since glitter dries faster.   Then I applied a second coat, and then touched up some bald spots.  I find with thicker glitter, it's best to let the polish dry completely between coats.  If it's too wet and you try to layer it, you end up moving the polish around and getting big clumps of glitter.  You'll definitely want a good top coat for this one since it dries with a gritty finish. 

I believe this collection was released in the beginning of December 2011, so it may be hard to find.  My local Sally's had a few left, otherwise online retailers would be your best bet.

Thanks for stopping by!

K

Monday, January 23, 2012

China Glaze Love Marilyn and Marry A Millionaire

Hello all!


Happy Monday!  So my plan was to post a different polish from the Eye Candy collection everyday, to kind of spread my stash out.  I would love to review an entire collection in one post, but I don't think my wallet would like that!  However, I realized that I underestimated the size of my stash, and forgot about an order that's coming today!  So today I have 2 more polishes from the China Glaze Eye Candy collection and tomorrow I'll show the last 2.


First is Love Marilyn, which is a clear base with small red glitter and larger silver glitter. 
China Glaze Love Marilyn
3 coats of Love Marilyn *
no flash with artificial light
w/flash
Love Marilyn is very sheer, I used 3 coats for almost full coverage. You can see a few bald spots in the pictures.  The formula is pretty easy to work with, but it's quite thin.  I have to say, I'm not a big fan of this one. I'll have to try it as a top coat......maybe it's just too much red glitter for me.


Next is Marry a Millionaire. This one is definitely unique, at least in my collection.  MaM is a clear base with purple multi-colored glitter as well as purple bar glitter.
China Glaze Marry a Millionaire

2 coats Marry a Millionaire *
no flash with artificial light

w/flash
I was pretty surprised by Marry a Millionaire.  As pretty as it was in the bottle, I didn't think I'd be that crazy about it.  It's amazing how a polish can look so much better (or worse) on the nail compared to in the bottle!  I'd say this is probably my 3rd favorite color from this collection.  I was able to get pretty full coverage with 2 coats and it applied fairly smoothly considering it's packed with several different sized glitter.


Tomorrow I'll have the last 2 polishes from the Eye Candy collection, and they just so happen to be my 2 favorite ones: Some Like it Haute and Lorelei's Tiara.  I'll also be reviewing my experience with online retailer Victoria's Nail Supply.


* I should add that these swatches are without a top coat.  I'm running low on my beloved Seche Vite so I'm rationing it until I can get to Sally's!


Thanks for stopping by!


K

Sunday, January 22, 2012

China Glaze Material Girl

Hello all!


Today I have Material Girl, another polish from the China Glaze Eye Candy Collection.  Pink AND glitter?  What more could a girl want?!
China Glaze Material Girl

2 coats of Material Girl w/topcoat
No flash with artificial light

with flash


Material Girl has a clear pink base jammed with all sorts of glitter.  It has micro glitter along with larger hex glitter and even a little bit of holographic hex glitter that you can see in the second picture.  The formula was surprisingly thin for a glitter,  so it made for easy application.  I used 2 coats for full opacity.  This is probably my second favorite color from this collection.  I love that it's really girly, but it's not too crazy for the everyday wear.


Thanks for stopping by!


K

Thursday, January 19, 2012

China Glaze Blonde Bombshell

Hello all!!

Today I have Blonde Bombshell from China Glaze's Eye Candy collection.  Eye Candy is one of 2 collections released for Holiday 2011.  I'm a sucker for anything glitter, so I had to snatch this one up along with the rest of the collection.....woops! 


China Glaze Blonde Bombshell w/topcoat

I love the color, but it doesn't seem to get along well with my skin tone.  Application was pretty smooth for a glitter polish.  It wasn't too thick, even though I used 2 coats for full coverage.  On my accent nail I stamped a leopard print design from Bundle Monster plate m57 with Konad Special Polish in Black Pearl.  I normally don't use the Konad Special Polishes, but this was given
to me as a gift.  I find that Sinful Colors Black On Black works just as well.  However, it is recommended that you use the special polishes for best results.


Thanks for stopping by!

K

My Favorite polish of 2011!

Hello All!!

For my first polish post I thought it would be fun to post my #1 polish from 2011.  It's Tinsel Town by China Glaze.  Tinsel Town is from the holiday 2011 collection called Let It Snow. 

China Glaze Tinsel Town

This polish is amaaaazing!  It's like New Year's Eve on your nails!  This is a glitter polish, so it's kind of thick and application can be tricky.  All I can say is have plenty of polish thinner and topcoat on hand.  WARNING!  Tinsel Town is a topcoat eater!  I recommend using more than one topcoat.  For this mani, I used a base coat, 2 coats of Tinsel Town (you can get away with one coat), followed by a coat of American Classics Gelous and then a coat of Seche Vite. 

Please excuse the horrible picture.  I'm still playing around with different camera settings and different poses.  Just bear with me for a while!

Thanks for stopping by!

K

Welcome!

Hello all!!
 
It seems pretty weird to be addressing an audience, considering I'm currently the only one reading this!   I decided to start this blog because of my love for nail polish.  I've always been a polish lover, but my collection started to really grow this past year.  The main reason I have taken this long to start blogging is because I'm afraid of being the "new kid".  There are so many nail bloggers out there that are more talented, have a better stash and can afford to buy the higher end polishes.   I have decided to end the excuses and just go for it.  I've been too worried about how I'll fit it, and if I'll ever have any followers.  If I happen to get some followers I'll be the happiest new girl ever!  If not, I'll just look at this blog as my way to document my nail polish collection, and have a place for pictures of my nail of the day and my swatches.  I should add that I plan on having giveaways as a way to say thank you for following my page.  My hope is that I'll give you some inspiration for your manis, or teach you some new tips or tricks. 
 
Have some questions or comments for me?  You can comment below or e-mail me at KnailedIt@yahoo.com.  Again, I am new at this, so please don't be afraid to contact me!
 
Thanks for stopping by!
 
K